In the two part series of this blog post, I will walk you through the process of configuring & using a custom connector in Power Platform to connect to a Web API secured using Azure Active Directory authentication.
In the first part, we will deploy & secure a Web API using Azure Active Directory authentication. In the second part, we will have a look at the process of consuming the API in Power Apps using a custom connector.
Part 1 : Build, Deploy & Secure a Web API using Azure Active Directory Authentication
Part 2 : Connect API to Power Apps using custom connector
Part 1 : Build, Deploy & Secure A Web API using Azure Active Directory Authentication
Create a new ASP .Net Web application project using Visual Studio
Select references for a WEB API & MVC project. Note: We will define authentication later
Add a new empty controller to the project. Right click on the “Controllers” folder & select Add -> Controller -> Web API 2 Controller -Empty. Name this “ProductsController”
Add the following code to “ProductsControllers.cs” class that defines the product
public class Product
    {
        public int Id { get; set; }
        public string Name { get; set; }
        public string Category { get; set; }
        public decimal Price { get; set; }
    }
Add the following code inside the “ProductsController” class. It initializes a product array with necessary information and exposes two API operations (endpoints) that returns all products and a product by Id
        Product[] products = new Product[]
        {
            new Product { Id = 1, Name = "Tomato Soup", Category = "Groceries", Price = 1 },
            new Product { Id = 2, Name = "Yo-yo", Category = "Toys", Price = 3.75M },
            new Product { Id = 3, Name = "Hammer", Category = "Hardware", Price = 16.99M }
        };

        public IEnumerable<Product> GetAllProducts()
        {
            return products;
        }

        public IHttpActionResult GetProduct(int id)
        {
            var product = products.FirstOrDefault((p) => p.Id == id);
            if (product == null)
            {
                return NotFound();
            }
            return Ok(product);
        }
At this point the API returns the response as XML. We will modify the code such that the API returns response as JSON. In the “WebApiConfig.cs” add a new class as shown below.
    public class BrowserJsonFormatter : JsonMediaTypeFormatter
        {
            public BrowserJsonFormatter()
            {
                this.SupportedMediaTypes.Add(new MediaTypeHeaderValue("text/html"));
                this.SerializerSettings.Formatting = Formatting.Indented;
            }

            public override void SetDefaultContentHeaders(Type type, HttpContentHeaders headers, MediaTypeHeaderValue mediaType)
            {
                base.SetDefaultContentHeaders(type, headers, mediaType);
                headers.ContentType = new MediaTypeHeaderValue("application/json");
            }
        }
Resolve the reference errors by adding the following namespaces
using Newtonsoft.Json;
using System.Net.Http.Formatting;
using System.Net.Http.Headers;
In the “Register” function of the “WebApiConfig” class, add the newly created Formatter
config.Formatters.Add(new BrowserJsonFormatter());
Build and Run the app – Browse to the URL – http://localhost: {portnumber}/api/products
You should observer the response being returned as JSON
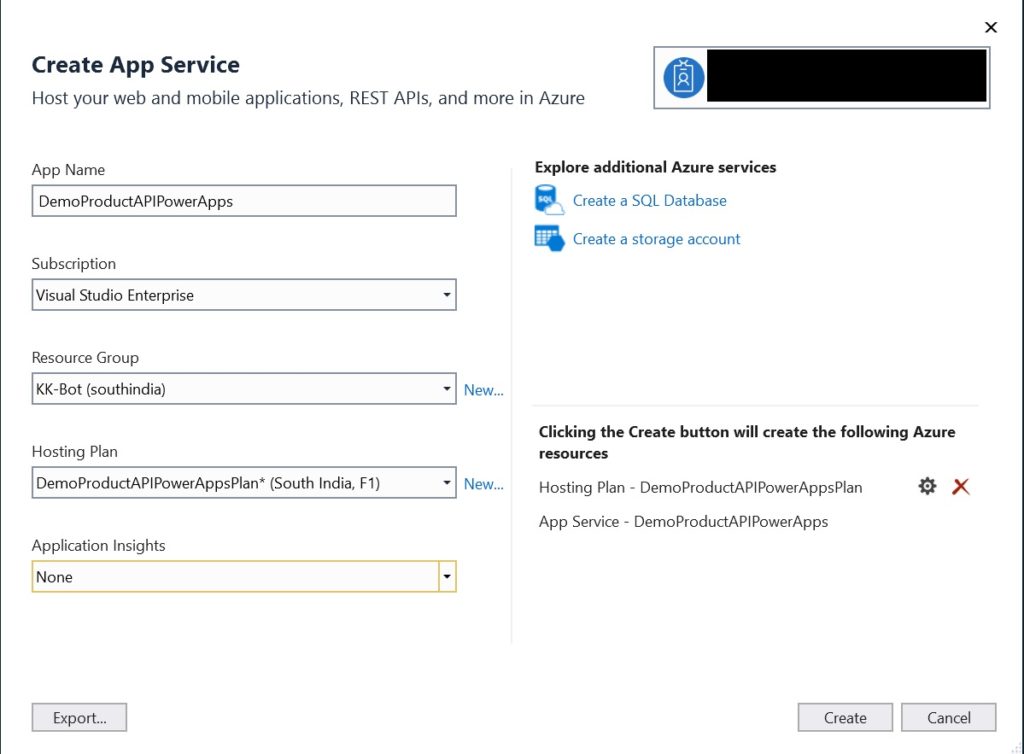
Let’s publish the app to Azure. Right click on the project and select “Publish”. Click on “Start” & choose “Azure App Service” as your publish target. Select “Create New”. Also, choose “Create Profile” to modify the app service details.

Enter the app service details. Select the account (has relevant access) which you want to use for deployment. Note that this will create two new Azure resources, a hosting plan & a app service in Azure. After the resources have been provisioned. Click on “Publish”.

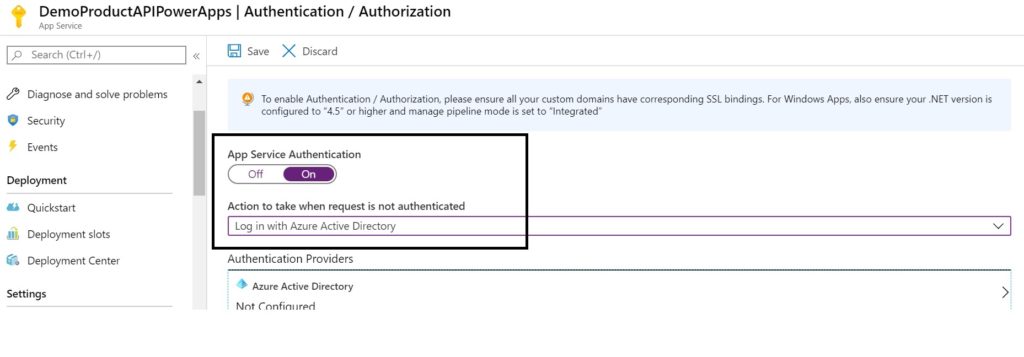
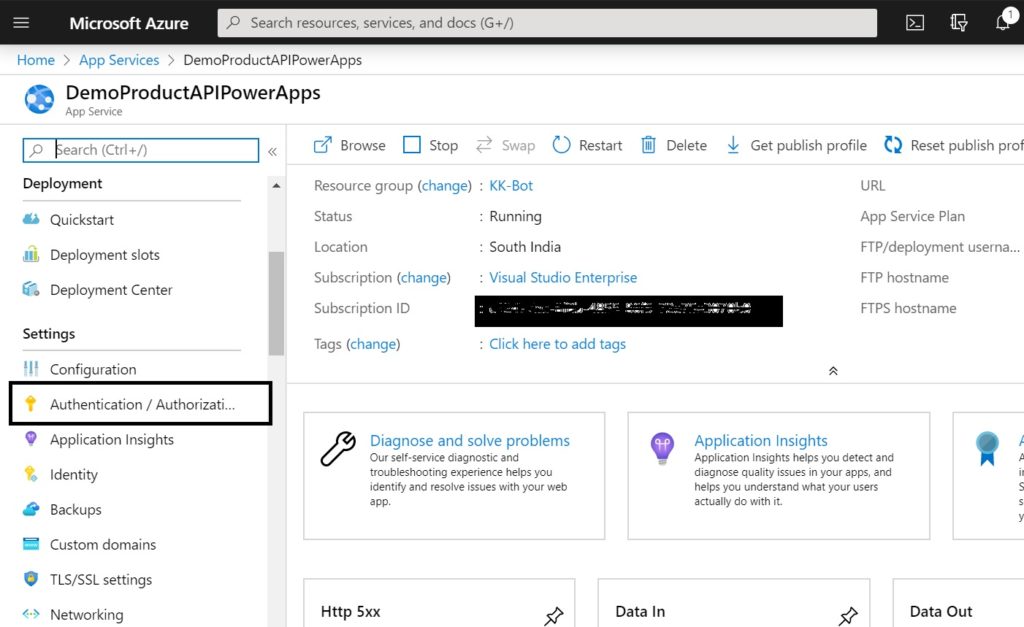
At this point, the API has anonymous access. We will now secure the API with Azure AD Authentication. Login to the Azure Portal. Under “App Services”, select the App service that we just provisioned above. Select “Authentication / Authorization”.
Change the options as shown below

Under “Authentication Providers” click on “Azure Active Directory”. Create a new Azure AD app and click on “OK”. On click of “Save” , an app gets registered with AAD. Click on “Azure Active Directory” again, select the app and make a note of the Client Id.

The API is now deployed to Azure and secure. If you visit the app URL now, it should ask you to login using a work or school account.
In the next part of this blog post, we will look at the process of consuming the API in Power Apps using a custom connector.


Nice ! can we use drive behaviour 🙂
thanks, how do we get the username from the controllers? at the moment I am injecting IHttpContextAccessor into it but it’s null, thanks!
thanks, how do we get the username from the controllers? at the moment I am injecting IHttpContextAccessor into it but Identity.User.Name is null, thanks!