This is the second part of the three-part series of my blog where I detail the steps to build a Power Virtual Agent bot and use a Power Automate flow to extend the abilities of the bot. We will also look at the details of publishing the bot to a website.
In the first part we built a Power Virtual Agent Bot with a simple topic. We will build on the same bot and create a more complex topic.
- Part 1 : Build a simple Power Virtual Agent bot
- Part 2 : Integrate Power Automate with the bot
- Part 3 : Publish the bot to a custom website
Here’s the scenario: The user asks for categories of posts present in this site to the bot. The bot responds with the list of categories (Power Virtual Agent Entities). Once the user clicks on a category, all the posts that are present in that category will be displayed dynamically to the user. I have deployed this bot in this site (bottom right–hand corner) if you want to see what it would look like.
Let us get started.
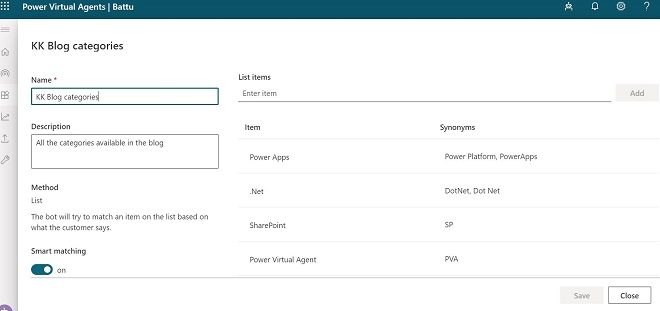
First, let’s create a new entity that we will use to display all the categories of posts. Navigate to the entity section of your bot and click on New custom entity. Choose a name, we will call it KK Blog Categories.
In the List Items section, add all the categories present. For instance, Power Apps, SharePoint etc., and click on Save. You can also add Synonyms which the bot will use to match the corresponding list item.
Navigate to the topics section of your bot in the Power Virtual Agents portal and click on New Topic.
Choose the title as Show all categories in the blog.
Choose some trigger phases like Show me all the categories. Enter all the trigger phases relevant to your topic and click on Go to the authoring canvas.
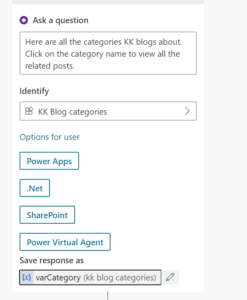
The step following the Trigger Phases will be Ask a question step. Click on the plus sign and add the step. In the Ask a question message box, type your message to show the categories. To present the user with options, in the Identify step, select the entity created earlier. In our case, KK Blog Categories. Click on Select options for user and select all the options present. Note that the response is collected in a pre-defined variable rename this to varCategory.
We will now add a Power Automate flow as the next step and pass the categories variable as an input to our flow.
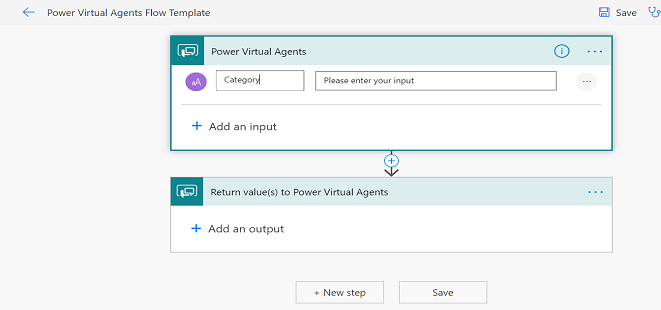
Click on the plus sign and add Call an action as the next step. Click on create a flow. This will launch the flow editor in a new window. As you notice, a trigger Power Virtual Agents and the last step to return values to Power Virtual Agents are already added to the flow.
The trigger can also take input from our PVA bot. Click on Add an input -> Text. Rename the input parameter as Category.
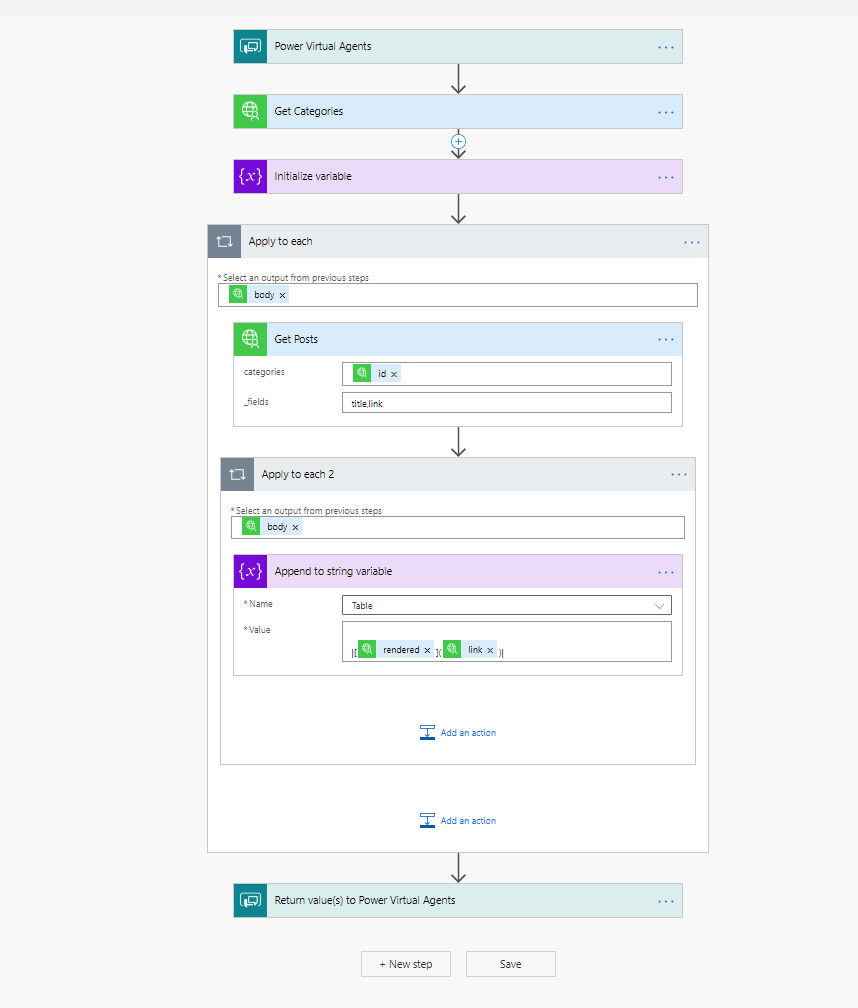
Note: Creating the flow to get all the posts from the site based on the category is out of scope of this blog post (I may write a new post about this). However, I will summarize the steps included in the flow until the new post is out.
To get all the posts from the WordPress site, I have configured a custom connector with two actions one to get the category id based on the category and the other to get all the posts based on the category id using the WordPress Rest API endpoints. One can also use the HTTP actions to get this done without a custom connector.
Once you have the return value as a string variable (posts in our case), go to the Return value(s) to Power Virtual Agents action, click on Add an Output and select Text. Enter the title as Posts and select the variable as the value. Click on Save.
Go back to the bot authoring canvas and select the input variable, varCategory, for the newly created flow in the Action step.
Add Show a message step and select the message as the output variable from the flow.
You can now choose to end the conversation by adding a End the conversation step to the flow.
In this part, we have learnt about creating new and using entities, author topics using variables and call a Power Automate flow in our Power Virtual Agent bot.
In the next part of this series, we will publish this bot to a website.


Can you share the flow template for us? It would be very helpful. thanks
Regards for this post, I am a big big fan of this site would like to go on updated. Loralie Aube Prue